4:1 Header Development
Purpose
The following article follows the development of our 4:1 tubing style header for the 1994-05 Miata applications. Initial development for this application began in May 2001.
All dyno tests were conducted at Dynamic Autosports Inc.
Background
Typically a Tri-Y (3-2-1) tubiing design header has been favored for "street" applications and a "4-into-1" design for "race" applications. The Tri-Y design has been proven to offer a moderate increase in power and torque throughout the powerband over the stock exhaust manifold. As compared to the Tri-Y design, the 4-into-1 header usually sacrifices some low-end power and torque for better high-end gains. In race applications, where the upper end of the powerband is used more extensively, this design is has been traditionally preferred.
But how would a 4:1 design prove for a street application? In the past we have found that a 4:1 design can be much louder than a Tri-Y design. Would this be true? Would it provide more, or less power? Should we change the design of our headers if the advantages of 4-into-1 design proved significant? These questions could only be answered by undertaking extensive R&D sessions.
Development
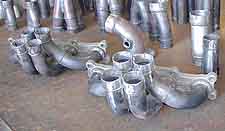
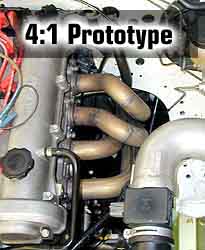
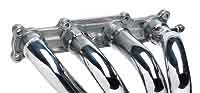
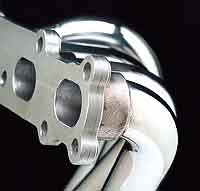
Early in the design phase of these headers, it was decided that a new header would be designed around a new cast-stainless steel header flange. It was also decided that 304 stainless steel tubing would be utilized for all tubing, collectors and flanges. Designed by Racing Beat's co-founder Mr. Ryusuke Oku, the engine-to-header flange features a "matched port" design that allows the exhaust gas to transition smoothly from the exhaust port to the header primary tubing. Unlike conventional header designs, this flange design eliminates the need to "crush" the primary tubing into an oval shape in an attempt to match the exhaust port opening. But before the design of this new flange could be completed, the final diameter of the primary tubing needed to be determined. This selection would occur after the data was reviewed from the extensive test sessions that were upcoming.
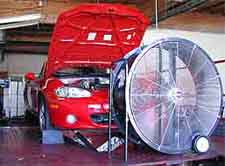
Racing Beat's chief engineer, Jim Mederer, made the decision to conduct all header development on the Miata chassis. A plan was laid out to create a set of various exhaust manifolds that allowed for various combinations of different tubing diameters, lengths and configurations to be installed while the car was connected to a chassis dyno. The stock exhaust system was removed from the car and suspended over the car, thereby allowing the prototype header setup to utilize the complete stock cat-back exhaust system. The test car vehicle ended up looking like some kind of odd swap-buggy, but the test results that we obtained from this test method proved to be very valuable!
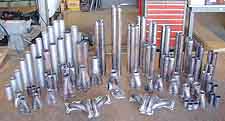
Prior to testing, Racing Beat's fabrication shop developed a total of four (4) different exhaust manifolds, each one featuring a different tubing diameter. The manifolds would be the starting point for all header development. Next, sets of tubing were cut to various lengths to allow for different primary tubing selection. Connecting flanges were fabricated to connect the primary tubing to the secondary tuning. Various lengths of secondary and collector tubing were fabriacted to allow the system to mate to the stock exhaust system. From this array of various tubing pieces, a large selection of combinations could be tested.
 |
 |
Initial Testing
The initial test vehicle that was used for our test sessions was our 1999 Racing Beat Miata. Among the suspension, clutch and transmission modifications, our car was also equipped with our High Flow Intake. In later test sessions a series of "stock" cars were utilized.
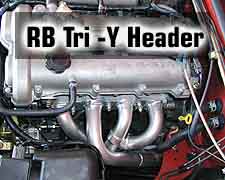
The first tests started with the prototyping of components for a Tri-Y configuration. The smallest diameter tubing manifold was selected and testing began using short primary tubing sections, then each run changed to a progressively longer length. As the primary tubing grew in length, the secondary tube would be shortened, thus keeping the overall length of the header the same. Each section of tubing was slip-fit into place and the entire assembly was strapped down to the chassis.
After the first 25 tests were completed, the test session was changed from the Tri-Y configuration to a 4:1 design. We again restarted the fitting process using the smaller diameter exhaust manifolds and working up through the larger diameter manifolds. This allowed us to make our first comparisons against both header designs. Using this process, the first day of testing yielded over 129 chassis dyno tests!
 |
 |
Testing and Development
After evaluating the test data from the first test session, it was decided that further development of the 4:1 header design was warranted. Based on the dyno information gathered, a prototype header was fabricated by Racing Beat for a direct comparison against the stock system, our Tri-Y header, and the Brainstorm Performance 4:1 header (no longer in production).
The results of the testing showed that the prototype 4:1 out performed the Tri-Y in top end power, but was not as strong in the midrange. As compared to the Brainstorm header, the results were comparable at the top end, but midrange power needed to be improved. The Brainstorm header was proving to be a worthy competitor!
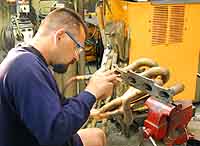
Now this is where the challenge began! Over a period of weeks, a series of dyno test sessions were undertaken with various modifications to the prototype header. Each test session was conducted comparing the Racing Beat Tri-Y header, the Brainstorm 4:1, and the prototype 4:1 header. Many different modifications to the prototype were undertaken including extensive porting of the manifold flange and several different collector designs. Each modification was throughly tested back on the chassis dyno.
 |
 |
Performance
Finally, these exhaustive revisions provided the results that we were looking for! The new RB 4:1 header now provided a gain throughout the power band and continued to produce more power further up the power band, unlike the Tri-Y design which had peaked at approximately 6200 RPM.
The attached dyno chart shows the comparison of the Racing Beat and Brainstorm 4:1 headers. For this final test session both headers have been installed on a "stock" 2001 Miata. As the results show, both headers offer improvements over the stock exhaust manifold, with a slight advantage to the Racing Beat Header.
Both headers produced an exhaust note that was louder than stock, but neither was deemed to be "buzzy" or "harsh" sounding.
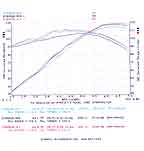
Final comparison |

Data for stock application |
Data for BS Header |
Data for RB Header |
 |
 |
Testing Statement
All data provided above is presented as accurate and unedited. We attempt to provide "average" test results that reflect the true performance characteristics of each product. Experience has shown that dyno test results will vary from car-to-car, from test session-to-test session, and product-to-product.
Contact Racing Beat for more information or comments regarding this test.
Info & Orders
714-779-8677
Tech Line
714-779-8677

Repair Manuals & Books