Rotor & Side Housings
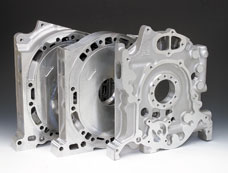
Racing Beat's aluminum front, intermediate and rear side housings.
Rotor Housings
When comparing 1986-95 rotor housings (non-turbo and turbo) to pre-1986 and RX-8 rotor housings, the most obvious difference is the elimination of the inner and outer water O-ring grooves from the sides of the 1986-95 rotor housings. From 1986-95, Mazda placed the O-ring grooves in the side housings.
Another significant, but not obvious, difference is the actual shape of the peritrochoid chamber in 1986 and later engines as compared to 1974-1985 13B engines. While differing only in a few thousandths of an inch, the difference is enough that we do not recommend mixing rotors or housings from 1985 and earlier 13B engines with 1986 and later engines.
The manufacturing process involved in the production of a rotor housing, overly simplified here, incorporates a flat piece of steel that has been forced under load into a peritrochoid (figure eight) shape. This piece is then positioned in a jig, around which the remainder of the rotor housing is cast with an aluminum alloy. The inner steel surface is then machined and chrome-plated. The chroming process provides a superior sealing and wearing surface for the apex seals to ride against.
Adequate cooling of rotor housings in racing applications is a challenging task. Inadequate cooling will most certainly lead to rapid apex seal wear, usually in the form of "chamfering" of the leading edge of the apex seal curved surface, and rotor housing inner surface deterioration; specifically, severe cracking, chipping, black deposits and chattering.
One remedy that works to improve cooling is cutting grooves in the water jacket in the vicinity of the leading and trailing spark plugs. This process produces a small amount of turbulence, removes quite a bit of the anodizing and oxide that coats the aluminum, and thins the housing wall slightly. These combined effects improve heat transfer from the housing surface and dramatically improve apex seal and housing inner surface life. This modification is a necessity in racing engines, but is not generally useful in street engines, unless substantially supercharged. If needed, Racing Beat can perform the Water Jacket Modification procedure on your new or used rotor housing.
Side Housings
The most significant change found in the 1986-95 side housings (as compared to pre-86 and RX-8 housings) is the placement of inner and outer O-ring grooves onto these housings This change makes it more difficult to lap and re-use these side housings. Because we recommend removing no more than .002" of material from each side housing surface to maintain the integrity of the O-ring grooves, it is possible that unacceptable "wear grooves" may remain after lapping, necessitating replacement with a new housing. In the case of 1974 to 1985 side housings, removal of up to .008" per side is allowable to remove damage or corrosion.
Mazda has used a gas nitriding process on the side housings to increase wear durability since 1979. Gas nitriding is a surface treatment that is typically only .001" to .002" thick in this particular application. While lapping a side housing surface effectively removes this nitriding, engine wear is not greatly accelerated should you choose to rebuild with properly lapped housings.
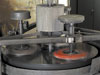
We recommend that side housings always be re-surfaced on a lapping table as part of a thorough engine rebuild. While it is possible to grind side housings, few grinding shops can match the superior surface finish a lapping table provides. We offer our customers side housing lapping services to assure properly resurfaced housings.
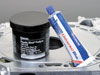
When building a peripheral port engine using 1986-95 components, it is necessary to fill the intake ports on the side housings with Devcon Plastic Steel Epoxy, or an equivalent, as these intake ports no longer serve any purpose. We recommend using front and rear 4-Port turbo side housings, if possible, rather than 6-Port side housings when building a peripheral port engine. The 4-Port housings, because of their overall smaller intake port area, offer a slight advantage in terms of minimizing rotor side force imbalance caused by the small amount of combustion gases that leak by the apex, side, corner, and oil seals.
For proper adhesion, the interior of each side housing intake port must first be "roughed up" to provide a better bonding surface for the Devcon. Then, thoroughly clean each port with acetone. Lay each housing with the flat side facing up from the table. Use a piece of cooking foil, jammed into each port runner, to limit the Devcon to about one inch thickness. Fill each port with Devcon, leaving about a 1/16" depth between the top surface of the Devcon and the flat surface of the housing. By leaving this 1/16" gap, the likelihood that the side seals might chip away at the Devcon is eliminated. After the Devcon has thoroughly hardened (allow at least 24 hours) trim away the "meniscus" of the Devcon with a square-end rotary file to prevent Devcon chips from breaking off during engine operation. RTV silicone can be packed into the the intake port from the outside to act as a sealant, preventing air leakage should the Devcon loosen.
Prior to placing the inner and outer water jacket O-rings into place we recommend using a small brush and applying a thin coat of Hylomar into the O-ring grooves. Hylomar, a blue-colored, non-hardening sealant, works well to retain the O-rings in place during engine assembly, and it appears to improve the O-ring's sealing ability. Additionally, a thin coating on the O-rings themselves is recommended after they are in place.
Copyright 2007-2024 Racing Beat, Inc ©

Repair Manuals & Books