Miata Magazine:
Sway Bar Installation
Select the correct sway bar for your Miata:

Sway Bar - Solid - Front
90-93 Miata
Racing Beat-designed sway bars for the 1990-93 Miata reduce chassis roll in turns and increase your car's ... ![]()

Sway Bar - Solid - Rear
90-00 Miata
Racing Beat Sway Bars - Production
Sway Bar - Solid - Front
94-97 Miata
Racing Beat-designed sway bars for the 1994-97 Miata reduce chassis roll in turns and increase your car's ... ![]()

Sway Bar - Tubular - Front
99-00 Miata
Racing Beat-designed front tubular sway bar for the 1999-2000 Miata reduce chassis roll in turns and increase your ... ![]()

Sway Bar - Tubular - Front
90-93 Miata
Racing Beat's front tubular sway bars for the 1990-97 Miata applications offer you the ability to further tune ... ![]()
Sway Bar - Tubular - Front
94-97 Miata
Racing Beat's front tubular sway bars for the 1990-97 Miata applications offer you the ability to further tune ... ![]()
Feature article reprinted from the 1999-VI issue of Miata Magazine.
Antiroll bars mostly come into play during hard cornering when weight transfer causes the body to heel over. By loosely connecting the opposite sides of the suspension, the antiroll bar transfers some force from the loaded to the unloaded side, thus keeping the car level. In other words, the bar partially defeats some of the suspension's hard-won independence. A little connection helps keep things level, but too much means a choppy ride and wheels that bounce across the road.
The perfect bar should strike a balance between grip and compliance. Its size and shape, end-link design, and bushing types all contribute to its performance. Usually it is a good idea to change both the front and rear bars simultaneously, since body roll is directly related to cornering grip. If only your rear suspension has been stiffened, you may find yourself with an oversteering, tail-happy monster. Beef up just the front end and the understeer gets too insistent.
One more thing: If you've already stiffened or lowered the springs, fit appropriately milder bars. A usable suspension strikes the balance between ride and stability; once the suspension becomes too firm, it’s not only uncomfortable but downright counter-productive. Too much roll resistance can cause the inside front tire to lift in hard cornering – just the opposite of the effect you were after.
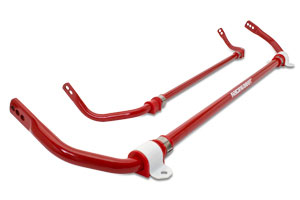
The bars we're going to install are by Racing Beat. The rear unit is 5/8" in diameter and made of solid steel.
It comes with a set of urethane center bushings, some special hardware to reduce side-to-side sliding, and a $79 price tag. To install, first jack the rear of the car up as much as possible and secure it with good stands. You don't even have to remove the tires. Unbolt the top of the end link on both sides of the car. (Be careful here. While the end links should be unloaded, they might still pop up or down with considerable force.) You will need a socket and a standard wrench, both 14mm, for this job. The bolts are also pretty tight, so watch those knuckles.
Once the ends are free, remove the four bolts holding the center brackets in place and take the bar off the car. Wow-that's the easiest suspension part you'll ever remove in your life!
2. Lay the new bar down next to the old one, then flip one over so that the two bars mirror-image each other. (Otherwise, an optical illusion takes place that makes them look unequal). Verify that the bars are in fact exactly the same length.
There may be multiple end-link holes on the new bar. These allow you to fine tune the bar once it's on the car. The closer the links are to the ends, the less force the bar will exert.
3. Apply a thin schmear of white lithium grease to the inside of the bushings before wrapping them on the bar. (This helps keep down the squeaking.) Fix the new bar and bushings onto the chassis and cinch the nuts down hand-tight. Push the end links into place and fasten hand-tight.
At this point, make sure the bar is evenly located side to side and wipe off any extra grease with rubbing alcohol. Tighten the center brackets to about 12 lbs.-ft., install the new movement stoppers (if supplied), and clamp a good set of locking-jaw pliers right next to one of the bushings to keep the bar from sliding during final tightening.
4. Put the car back on the ground to settle the suspension. Finally, snug up all the hardware good and tight. There you are: easy as pie.
5. Now for the front bar. We selected Racing Beat's new 1-3/8" tubular bar for this application. At 5.5 pounds it weighs about half as much as our 1993 model's solid OE bar, even though it is more than 3/8" bigger in diameter. And, since twisting force is only transferred through the outer portion of a tube, the hollow bar offers all the stiffness of a solid one. This bar came with a set of urethane bushings designed to work with the original center brackets; beefier brackets are available for cars intended for autocross or racing, since the OE sway bar mounts have been known to crack under heavy use. The tubular Racing Beat bar sells for $150, which is about $60 more than a solid-steel equivalent.
The super-studly bracket kit adds another $65.
6. Jack up the nose as high as possible, and this time take the tires off. Remove the (disgustingly oily?) plastic front splash pan, then unbolt the top of the end links just like you did at the back. Remove the four bolts that hold the center brackets. On cars with a/c it can sometimes be hard to get the bar out past the hoses, so be ready for some coaxing. As it happened, our own a/c-laden car presented us with no particular routing challenges.
7. Slide the new bar more or less into place, then grease up another set of bushings and install them onto the bar.
Bolt everything back up with the appropriate brackets, even out the bar from side to side, and hook up the end links last.
8. Lower the car to the ground to settle out the suspension, then reach in and final-tighten all the fasteners. Raise the car once more, refit the plastic splash pan, and you're ready to put the car down for its test drive. The front install should take less than an hour, and again there are no real hassles to watch out for. Best of all, no alignment changes will occur from swapping out either bar (unless you significantly cock up their side-to-side placement, that is).
A after making a major change to the suspension like we did here, you need to resist the urge to dash off to your favorite twisty road and push the car to its limits. For a little while, those limits are again unknown to you, so probe the new feel carefully. I personally know two different people who stuffed their cars right after putting on new antiroll bars: The chassis feels so much flatter and grippier through the comers that a false sense of security often settles in. While beefier bars will make the car hunker down flatter longer, they also diminish the amount of warning you get of impending trouble. Get to know the car's new over- and understeer limits again before you get too cocky.
Once you do get used to a larger set of antiroll bars, however, you may wish you'd installed them the day you bought the car. On our '93, the ride was not degraded in any perceptible way, while feedback and tautness during cornering were much improved. The overall balance in hard cornering is also a lot better, and the car now settles down between tight, fast corners much faster.
I was very impressed with the finish of Racing Beat's parts, though the urethane bushings they supplied did start creaking after a few days. You can swap these for graphite-impregnated units (found in speed shops) to quiet the bushings if needed.
Reprinted with permission from Miata Magazine, MediaSource International. This article was printed in Miata Magazine 1999-VI.
Info & Orders
714-779-8677
Tech Line
714-779-8677
Repair Manuals & Books